How to Modify a Mini Fridge for a Camper
Every camper build has to answer this question: How do we keep perishable foods fresh?
Our solution: A modified sleek black mini fridge.
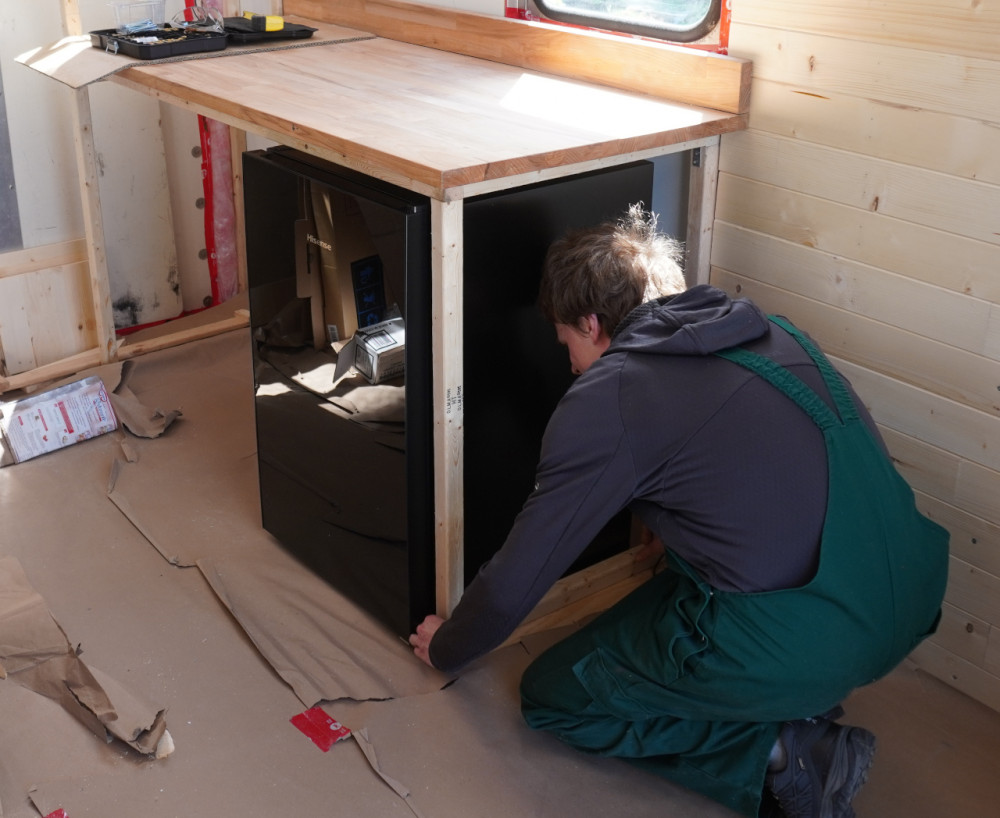
We settled on a full fridge unit (Amazon has it for CA$400, but we found ours refurbished at Factory Direct), rather than one with a freezer. There's nothing worse than unexpectedly mushy ice cream, so we opted for more fridge space instead.
Before making our decision, we debated the following options.
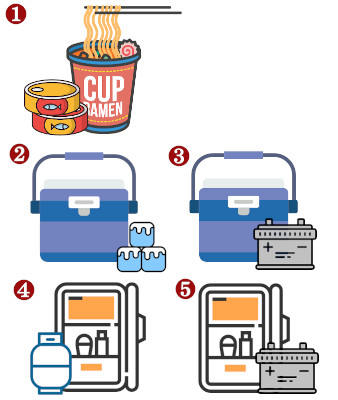
- just eat food that doesn't go bad — instant noodles!
- use a cooler and top it up with ice every so often
- use a cooler that runs off your car
- use a fridge that runs off propane
- use a fridge that runs off your car
For short-term camping, the first three are viable options. In the RV world, you're likely to have a propane fridge or a fridge that can run on a 12 V system. Unfortunately, these fridges are insanely expensive at over CA$1,200 for the same space as a mini fridge at CA$170!
Is there a better AND cheaper way?
In this post, I'll cover the solution I came up with, which was combining an inverter, start capacitor, and your typical, dorm-style mini fridge into the perfect, camper van fridge on a budget.
This post will be more technical than usual, so hopefully I don't lose you on the way. If you're here for the TL;DR, click here.
How do fridges work?
Let's start with a primer. One of the main components of a fridge is the compressor, which compresses the coolant and thus, increasing its pressure and temperature. In this state, the coolant releases its heat outside the fridge (that's why you feel warm air below/behind some fridge models). The coolant is then fed into a tiny nozzle where it vaporizes and expands, which means its pressure AND temperature are going down. This seems counter-intuitive, but in this cooled state, the coolant is actually absorbing heat from inside the fridge. The compressor then draws the coolant away from the inside of the fridge and the cycle repeats.
Compressors require electrical power to operate. A household fridge uses the 110 V mains line, whereas camping fridges have special compressors which can run on 12 V from your car's battery. Seeing as our primary power source is 24 V DC, we'll need to come up with a way to bridge the two.
From camper van battery to regular fridge
I know what you're thinking (since I already mentioned it), just use an inverter!
An inverter transforms the 24 V DC into the 110 V AC that we need. Of course, nothing is as easy as it first appears. Turns out, inverters are inadequate at running large inductive loads.
Typically, fridges use single-phase induction motors to operate the compressor. Single-phase motors do not have a unique rotating magnetic field like multi-phase motors. The field alternates between pole pairs and requires a secondary magnetic field that causes the rotor to move in a specific direction. Maybe my little graphic of a multi-phase induction motor will enlighten you:
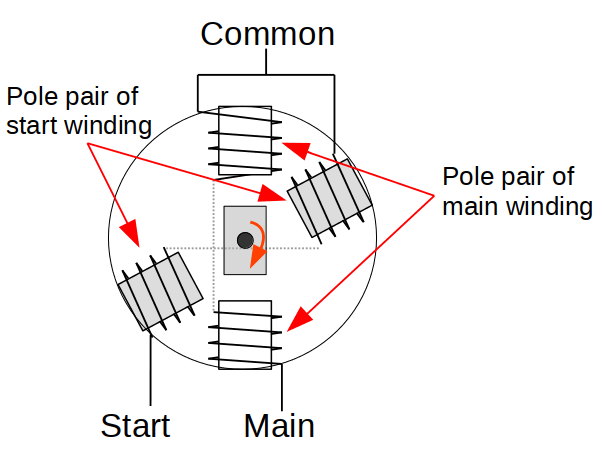
In contrast, a single-phase motor would not have the grey windings. Imagine then, the rotor in the centre would just flip sideways and vibrate as there is no directional magnetic field.
This brings us to the crux of the matter, which lies in the startup and the secondary magnetic field. In order to give the motor enough momentum to start up, fridges have a so called "start-winding." It's a second set of windings which are hooked up in parallel to the main motor windings for a few seconds during start up. As these windings have a smaller inductance than the main-winding, they run slightly out of phase and thus, create the necessary secondary magnetic field to properly turn the rotor.
Since the difference in phase is very small and all energy introduced to the motor is entirely dissipated into the windings (the motor is not moving yet) the current flowing into the motor can be 6 to 8 times higher during start up than when the motor is in motion.
What does this mean? A motor that is rated at 100 W will consume 600 W to 800 W just to start up.
800 W ain't so bad if you have a 1000 W or 1500 W inverter, you think.
What's that thing about inductive loads?
Assume we have a simple circuit. On the left side, we are hooked up to our AC source (our inverter) on the right side is our load.
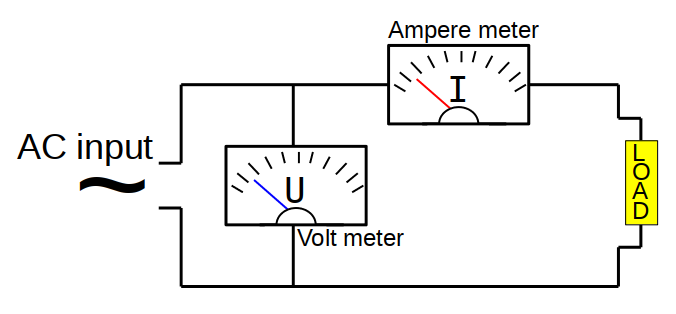
Imagine an incandescent lightbulb as the load, we can simulate how voltage and current behave over time.
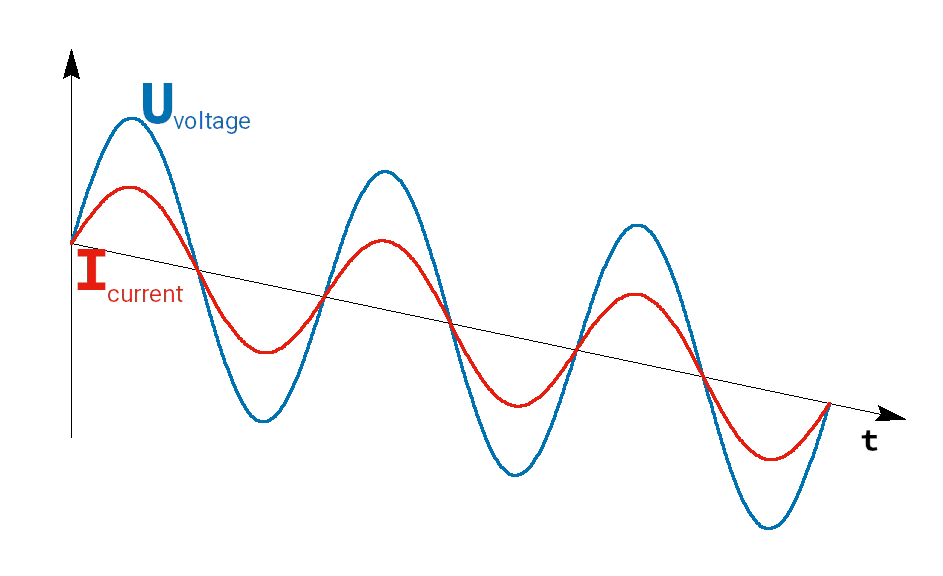
At the beginning of the phase, the voltage is 0 V and the current is 0 A.
As the voltage ramps upwards in a sinusoidal-shape, the current follows at the same time. This is a classic example of a resistor (the lightbulb) where voltage and current are in phase.
Now, replace the lighbulb with our fridge and things start to get interesting.
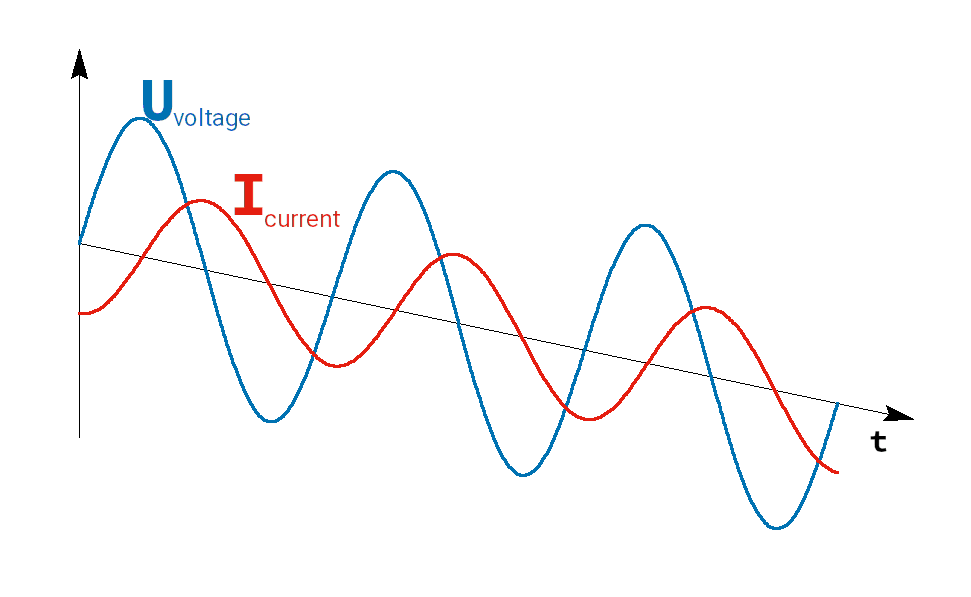
When the voltage is at 0 V, the current is at its maximum. On the other way around, when the voltage is at its maximum the current is at 0 A. The two are out of phase by 90°.
It sounds not very intuitive, but the explanation is rather simple: while the voltage is rising, energy is being stored in the coils (or motor windings as per the multi-phase motor diagram) in the form of a magnetic field. As you drop the voltage, the coils try to get rid of their stored energy. To get rid of the energy, the current continues to flow in the same direction. The voltage, however, changes its direction and is now working against the coils: the current rises.
And no, I haven't forgotten about self-inductance, which I've left out to spare my editor (Sachiko) from tearing her hair out. In short, your inverter has a very hard time driving the voltage back down while the coil in the compressor motor tries to keep it up.
The next logical step is, how can we reduce the current, so the inverter can still drive the compressor?
There are a few options here, but I chose the path of least resistance. Instead of hooking up the start-winding directly parallel to the main-winding of the motor, I added a capacitor in series. With alternating current, a capacitor works opposite to a coil. First, the current rises, then the voltage. With that I can create a phase that's offset by 90° to the main phase. It creates a much higher torque through the start-winding, but also reduces the current flowing into it because the capacitor works like a resistor in an AC circuit.
How do you hook it up?
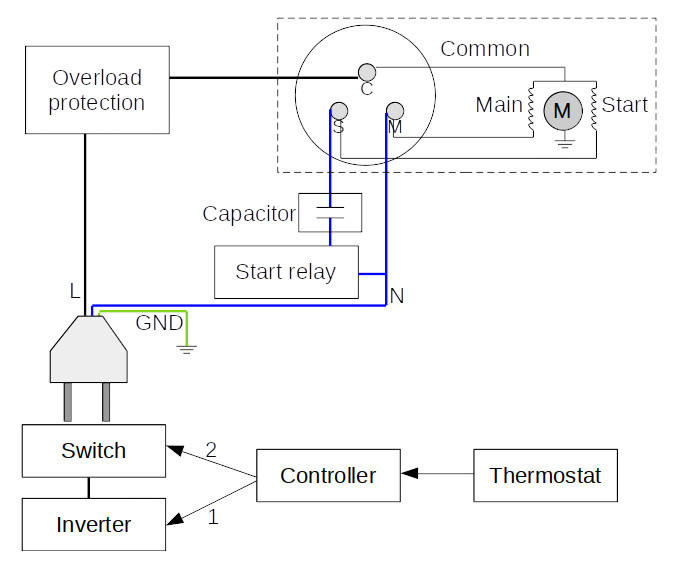
There are kits available online with a starter capacitor, overload protection, and start relay. This graphic shows how a fridge is normally wired. You can see the mains cable (L) goes through the thermostat and an overload protection into the common connection of the compressor. On the other side is the connection to the main winding and a start-relay which runs the start-winding in the first few seconds.
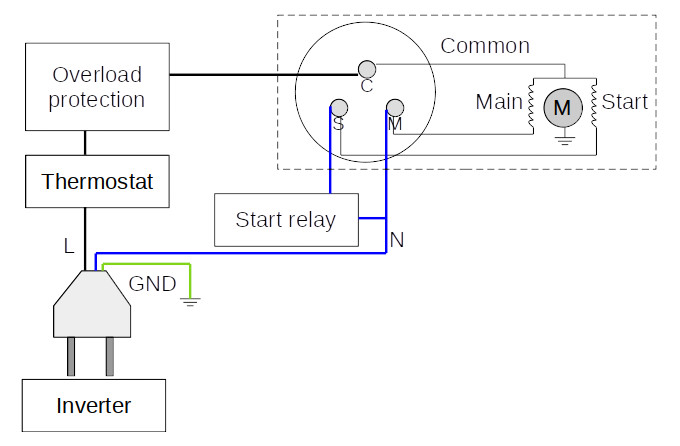
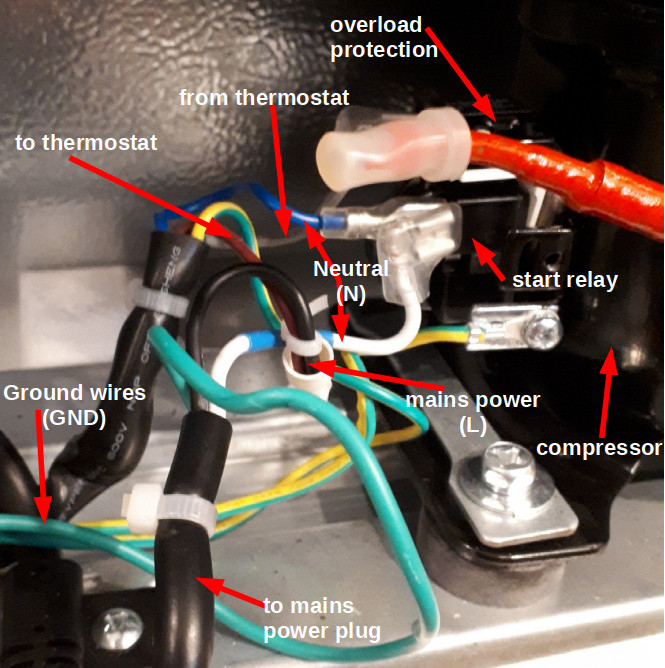
I tried to make the schematic as clean as possible because most likely, you will find this spaghetti in the back of your fridge. I've marked all the important wires and hope it's apparent enough which wire goes where.
Won't I need to run my inverter constantly?
A common argument against running a 110 V fridge in your camper is that you'll need to run your inverter constantly.
Can I change that?
Since I was already breaking up some wires to install the capacitor, I disconnected the thermostat and hooked it up to a controller instead. This will run the inverter only when the fridge needs to run. Here's a little diagram of how I altered the wiring to achieve the idea:
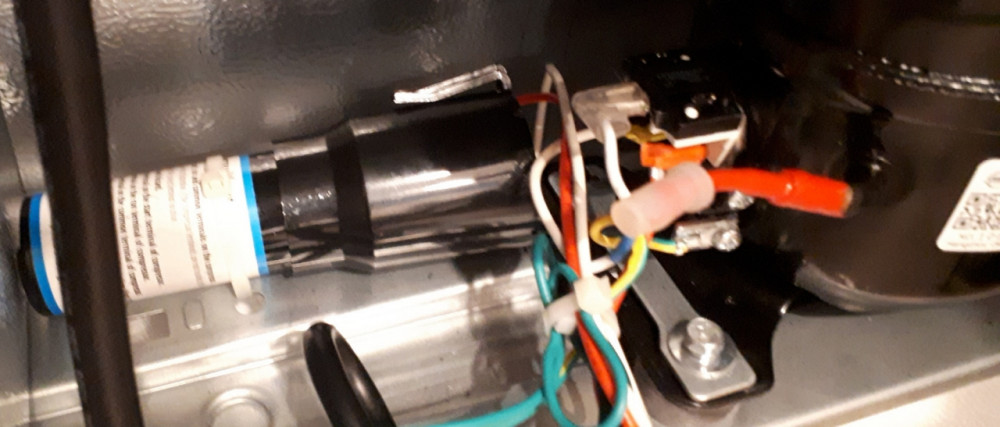
On the real fridge it looks like this. Here you can still see the overload protection. The start-relay was moved into the case of the capacitor on the left.
The controller is a relay-switch board with an ESP8266 microcontroller. This is a tiny computer (as in the stuff that sits in your smartwatch) which can read the input from the thermostat and output control signals to turn on the inverter. A few seconds later, when the inverter has started up, the controller will turn on the fridge.
Once the fridge is cool enough, the controller turns the fridge off again and also turns off the inverter. This microcontroller can also hook up to a wireless network. Down the road, I will create a little app for a tablet, where you can turn on the inverter if needed otherwise, or also to check how often the fridge runs, etc. This could be useful if, by accident, the door didn't close properly. Then it can send us an alarm that the fridge was too hot for too long.
It is important that you use both the original overload protection as well as the start relay from your fridge. The capacitor-kit from Amazon comes with its own protection and start relay, however, these are designed for bigger compressors and would not properly protect a small fridge. Lastly, make sure you use a pure sine wave inverter. Modified sine wave or rectangle will cause issues with inductive loads like a fridge compressor. The sharp edges of the output voltage cause higher currents in the inverter and can heat up the motor beyond its specifications.
If you've made it until here, you're now set to run a regular household fridge in your off-grid installation.
TL;DR for the layman
If you're not here for the electrical mumble jumble, here are your bullet points:
- It is possible to run a regular mini fridge in your off grid set-up with a few minor adjustments.
- You'll need a pure sine wave inverter (should be at least 1500 W) to transform your battery voltage to the voltage required by the fridge.
- Next, you'll need a starter capacitor kit, which you can purchase on Amazon. This reduces the current for when the fridge turns on so the inverter can properly power the compressor.
- You may want to consider installing a microcontroller so that the inverter is only turned on when the fridge needs power.
These mods will cost you CA$50 plus the price of your fridge. This excludes the inverter as it's necessary to power your laptop and other appliances. Another advantage is that now, you have all the mini fridge styles and models available for your build design!
More technical posts?
Did you learn anything from this post? Interested in more content like this? Leave a comment below! We've also modified a water heater to run on our 24 V system, which we'll publish in an upcoming post.
Until then, we'll see you on the road to pitches!
Moritz (& Sachiko)
Marius
Linda
Road To Pitches
Linda
Road To Pitches
Richardroact
Stan Duggan
roberto l arano