Categories
  • Camper Build 13
  • About us 4
  • Climbing 1
  • Thoughts 3
  • YouTube 8
Road To Pitches
  • About Us
  • Spreadsheet Tools
  • Blog
  • Contact
  • Store
  • YouTube
  • Instagram
  • Categories
As an Amazon Associate I earn from qualifying purchases. Learn more…
  • New Video: Custom Drawers That Will Fit Any Space

    We are SO behind on our footage. With the hot hot summer heat, climbing, and work taking over our schedules the past few weeks, we’re so happy to be releasing this episode!

    If you've read our blog post about How to Build Drawers, make sure you give this video a watch to see them in action.

    We cover a seemingly simple project of building drawers in this video. Rectangles, square corners, easy peasy right? Well, not quite, but we got through it and we’re really happy with the result. This was done with only a circular saw, mitre saw, a couple of power drills, a load of patience, and lots of ice cream.
    continue reading…

    Posted 5 years ago by Moritz.
  • New Video: Hot Water on Electrical, IKEA Furnishings, Electrical + Solar, and More!

    Hello friends!

    This episode, we cover a few crucial topics for van builds.

    • Eberspächer heater set-up and mounting
    • Electrical panel and hookups to solar
    • Hot water tank teardown and mod for 24 V usage

    We’ve chosen not to go too deep into these topics on YouTube as there are hundreds of other, more experienced builders with awesome videos. However, we do have more details and schematics for the hot water tank modification here.

    In addition, we talk a bit about where our name came from, using IKEA furniture to complete our build, and dealing with leaks in our box.

    We failed to include how we modded our fridge for electrical use, but you can read about it here in the blog.


    Thank you for your support!

    continue reading…

    Posted 5 years ago by Moritz.
  • Quickstart Guide to Creating YouTube Videos

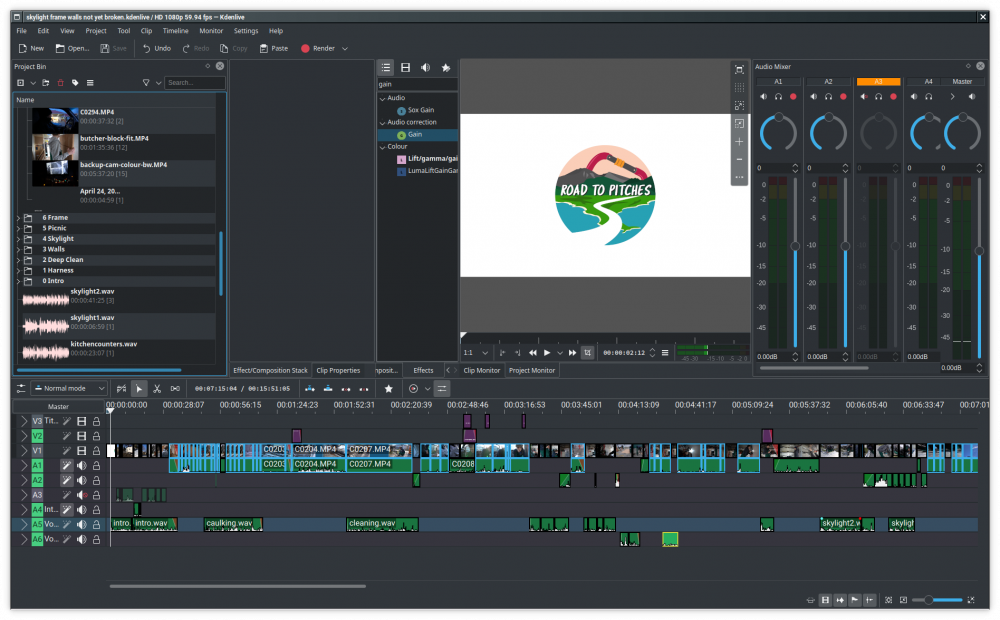
    I’m going to take a van build detour to show you our entire YouTube process, from filming to video processing and post-publication social media alignment. This post is applicable to new videographers or those interested in the behind-the-scenes of YouTube videos. For veteran YouTubers, perhaps what we do might inspire you to try something different!

    A fully edited video with all its cuts, tracks, and project files.

    When we first had the idea of filming our camper build to document and share our process, we didn't realize there were so many things to consider. But it turns out that Moritz and I each enjoy different parts of the process and we've had a lot of fun learning together. Being able to share our story in multiple formats has also been extremely rewarding.

    If you are new to all of this, don't let these tasks dissuade you! The best part is they can be broken down into bite-sized pieces. You'll begin to get the hang of making videos after editing around 45 minutes of footage.

    This post is MASSIVE, so I'm going to start with a Table of Contents, which doubles as a checklist for every video.

    continue reading…

    Posted 5 years ago by Sachiko.
  • New Video: Month #5. Installing Walls, Framing Dinette, and Why We Are Doing This!

    HELLO LOVELY PEOPLE! Can you believe this is our FIFTH video?! We can’t! 😄

    We’ve come so far since Day 1 of our journey. In this video, we will show you:

    • How we installed our pine panel walls
    • How we framed our dinette
    • Our travel route for next year (pending COVID-19 restrictions)

    To maximize the space in the box, we decided to FIRST mount the pine panels to plywood strapping that would situate between our box’s frames. Then, we would attach the pine panels at a few points to the frame itself. An alternative would be to attach strapping over the metal frame, then attach the pine panels on top of that. But, that would’ve reduced our box width by 4 inches.

    We used pine panels purchased from Home Depot, “Wallscapes 5/16-inch x 4-inch - 8 Feet Pine Knotty VJT T&G.” We do not recommend similar ones from Lowes—they were lower in price, but much shoddier in quality. Our layout is slowly coming to shape with the dinette framed. Moritz shows how he assembled the framing (sorry, no blueprint here, it’s all in his head). This was cheap 2x2x8 framing lumber from Lowes.

    For more details, check out the following posts:

    • It's All About the Right Framing
    • Let's Talk Money (Part 2)


    continue reading…

    Posted 5 years ago by Moritz.
  • New Video: Skylight, Leaks, Framing, Butcher Block and a Pandemic Picnic!

    First, a short, but very important tangent:

    We didn't get a chance to talk about this in our video, but we wanted to raise awareness about Black Lives Matter. Being privileged Canadians, we thought that this wouldn't affect us, but as we unearthed more evidence on systemic racism, we couldn't ignore it any longer.

    What you don't see behind the camera is that our differences in comprehending what "Black Lives Matter" means to each of us caused a huge rift in our relationship. We heatedly discussed what white privilege meant, racist acts we had both faced, biases we both have, and how we can be better.

    We encourage interracial couples (and generally, all couples) to explore these topics, regardless of how uncomfortable it makes you feel, because you're at a special advantage where you can see a broader perspective as two.

    Anyway. What a HUGE month for us! We knocked so many things off our list and crossed some major milestones, including installing our skylight, putting up our first wall, and framing the layout. We also take Cubert out for his first mini local trip, hit up Home Depot, and cut our butcher blocks! The whole build is coming together, slowly but surely, and we're so grateful that we have this project to keep us sane during the lockdown.

    Posted 5 years ago by Moritz.
  • New Video: Fan, Floors, Solar Panels!

    Nothing is more nerve wracking than CUTTING A HOLE IN YOUR CAR. But we did it, and we messed up. Luckily, it wasn't too hard of a mistake to fix. Worse was when we had to rip up our sub-floors and redo the entire thing.

    During this episode, we cover our design of the build and why we've settled on the current layout. We get our CA$2,700 Eberspächer heater to work and install our Fantastic Fan. The solar panels are mounted on the roof rack and we install, rip up, then re-install the sub-floors (spacers, insulation, plywood). PLEASE, learn from our mistakes.

    We hope this video offers you a mini-escape into our camper-building lives. Perhaps we'll inspire you to join the tribe and do the same!

    Stay well, everyone.

    Posted 5 years ago by Moritz.
← Previous
© 2025 Road To Pitches. All rights reserved.
  • RSS
  • Home